Long Hand Guy (ロングハンド・ガイ Rongu Hando Gai?) is a boss in Contra: Hard Corps.
Description[]
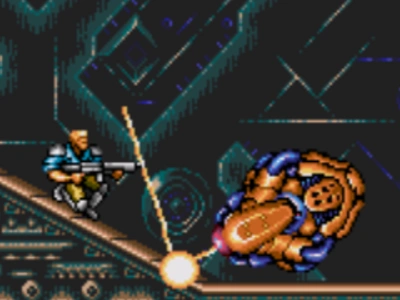
A bipedal, oval-shaped mecha that has spinning blades at the end of its limbs, allowing them to attach and gain traction on any surface, effectively allowing the boss to walk on either the floor, walls, or the ceiling.
The control deck is located inside the pod, allowing a person to climb inside and control it manually. This vessel also features a red core on one end, from which the boss unleashes most of its attacks throughout the course of the battle.
Appearances[]
Contra: Hard Corps[]
Long Hand Guy is the boss of the Jungle stage. It appears in all scenarios (save for the secret stage's scenario), regardless of the decisions taken by the player in the previous stages.
Deadeye Joe can actually be seen piloting this machine if the player selected "Rescue the research center" at the end of the first level.
Boss fight[]
This boss fight is the lengthiest in the game due to its several mandatory chasing and fighting sequences. The encounter consists of three main phases plus a few obstacle challenges to face from the mecha. Only during the three main phases can the mecha receive any weapon damage. During chase sequences it is invincible, with the psuedo-exception of one of its chase sequences, where it does not receive any damage delivered but is affected by weapons fire.
| Image | Chase sequence | Phase details |
|---|---|---|
 |
Short and simple. Right after its introduction, keep running toward the right side of the room until it stops to avoid being mowed down. |
After its introduction, the mecha will cling both limbs on the ceiling and start advancing toward the player. After a short chase, it will make a stop and cling one of its limbs on the floor, at which point it will become vulnerable. The vessel will start to spin with each shot taken, and after a brief moment, it will start shooting rapid rounds from the red core, potentially making it spray shots all over the room if it's still spinning. This makes Phase 1 of the fight more a test of patience and strategy than anything, as the player is required to choose well the moment when to shoot and when to stop, and also ration the amount of rounds they fire in order to prevent the core from potentially aiming at their position when it starts firing. The default A weapon is likely the best choice for this part of the fight (if not upgraded) due to its basic power of fire. |
  |
Once it has sustained enough damage, the machine will suffer an explosion and lose one of its limbs, using the remaining one as a manner of long arm to drag itself toward the player for another chasing section, this time along an upward ramp. Once at the top, the pod will retract its arm back in, pull out a helicopter-like rotor from its top and take flight. The pursuit then changes into an ascension sequence inside a vertical shaft. The machine will start hovering around, with the spinning blades frequently making contact with the walls. Shooting the vessel at this moment will push it away and make it ricochet all over the shaft if its blade makes contact with a wall with enough force, making the situation more dangerous overall, so it's advised to hold fire while in this section and focus more on evading the boss in case it gets too close, as well as not falling off. Similar to Phase 1, fire off a small, weak weapon very minutely in case of the blade coming dangerously too close to the player. Once at the top of the shaft, the pod will take out its arm again, cling it onto the ceiling and start swinging while it advances toward the left. Just make sure to hold onto the ceiling when reaching the top of the shaft and stay at the far right to avoid both the enemy and dangerous pitfalls (it's not necessary to advance manually, as the player will be automatically carried by the screen's border). Soon enough, the pursuit will take another break and end once the pod rolls from off screen atop a hill. |
Vulnerable once it starts to roll downhill, Phase 2 begins with the boss rolling forcefully downhill on a ramp until it reaches the bottom at the right side of the room, where after a large straight bounce upward, will come to a complete halt (care must be taken even if hanging from the ceiling, as the pod will bounce high up when it reaches the bottom). Once at the bottom of the ramp, the pod will fire a long laser beam in the direction the core ended up pointing at after rolling down; the ray will then start ricocheting each time it hits a surface, potentially allowing it to cover the entire room. Once this beam disperses, the pod will charge up a roll toward the top and repeat its attack pattern (by rolling downhill once more) until it receives enough damage. Keep hanging from the ceiling as much as possible and concentrate on unleashing the most powerful firepower available while dodging the laser until the boss suffers another explosion. On rare occasions, depending on how the core is pointed, the laser may end up bouncing inside of the bottom ramp. |
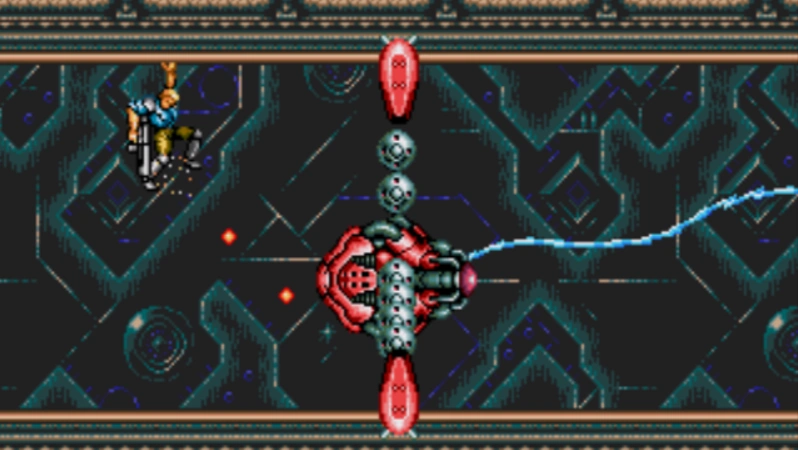 |
After receiving enough damage, the pod turns a shade of red and bounces to a straight stop wherever it was heavily damaged at. The pod will then roll rapidly to the left after rolling down another hill to the left side, will take out its arm once again, and start crawling away from the player while this gives chase for a change. If Deadeye Joe is piloting the vehicle, homing missiles will be fired at the player while it is crawling, until it reaches another wall where it will then hover up a small vertical shaft and start advancing to the right while swinging like it previously did. It will then drop to the floor and use spinning blades (like those from its limbs) to gain traction and move toward the right while it starts firing homing missiles at the player. Destroy them by using a weapon that covers a wide range or which has homing capabilities. The missiles cease once it disappears off screen and returns once more. The boss will briefly exit the screen and return looking similar to its initial form, with one limb clinging to the floor and another to the ceiling, and position itself at the center of the screen. Once it attaches its blades firmly onto the surfaces, Phase 3 officially begins. |
The limbs will now act as a manner of elastic bands, with the pod being pushed back as it takes damage. Just keep firing from the roof and don't drop down while firing, lest it springs forward and hits the player. The attached limbs on the ceiling and floor are harmless and the player can safely move through them if they require to cross to the other side of the boss, only the core itself is harmful to the touch (however, the lower limb still requires that the player slides through it, as the core is too low and otherwise the player would bump into it; only Browny can cross it safely by walking due to its small size). Soon enough, the vessel will charge up energy and start shooting three multicolored streams of energy from its core which cover a considerable area. It then almost immediately starts spinning in a counterclockwise direction while unleashing its deadly beam. It's advised to hold fire at this moment due to how much danger this part of the phase holds. The player must avoid the beam before it gets too close by sliding (or walking in the case of Browny) under the core, away from the beam's general direction, then jumping across the roof in the same manner and jumping down to repeat until the attack comes to a temporary halt. The core will make 2 1/4 rotations before resting, recharging, and resuming fire. Resume firing at the pod once it ends its laser cycle, and then resume the above 'hit-and-run' strategy until it is finally destroyed. A brave soldier can inflict some additional damage by using small concentrated rounds from certain weapons while the pod is unleashing rotating fire (similar to the previous two phases), as it bounces with less knockback and centers itself more quickly than if being hit with larger and possibly more powerful weaponry. |
Once the mecha has sustained enough damage, the machine will finally be destroyed, ending this lengthy boss fight. If Deadeye Joe was piloting it, he'll be briefly seen escaping via his jet pack as the vehicle explodes.
Contra Returns[]
You can help out the Contra Wiki by inserting content here.
Gallery[]
")
Trivia[]
- In Contra: Hard Corps, the section where Long Hand Guy takes out a helicopter-like blade and chases the player along a vertical shaft can be completely skipped. As the screen begins scrolling at the beginning of this section, keep climbing up the right wall until the player character leaves the screen, out the the boss's reach. Keep climbing up until the next section begins.